≡
  • Start Here
  • Start a Photography Business
  • How to Price Photography
  • Get More Photography Clients
  • In Person Sales
  • About
  • Blog

The Modern Tog

Take Your Photography From Passion to Profit

Everything You Need to Grow a
Successful Photography Business

Welcome Digital Photography School Readers!

digital photography school website screen shot

Hello there Digital Photography School readers! Thanks for coming on over from my guest post titled “When to Ditch the Day Job and Follow Your Dreams“.

My name is Jamie, and I’m a Madison, WI Wedding Photographer and am here to help equip you to have a successful photography business. There’s a lot of good stuff to learn here, so take some time to look around and learn something valuable for growing your business.

Curious who I am? You can read more about me and The Modern Tog here.

If you’re really observant, you can also find me juggling somewhere on this site as well. Yes, I juggle. Kind of. It’s amusing. I can also unicycle, but that’s not on the site (yet).

Here are some of my favorite posts on the site:  [Click to read more]

Categorized Under: Business Help Tags: Digital Photography School/ Photographer's Pricing Guide/ Photography Tools

Welcome Inspire Me Baby Readers!

Inspire Me Baby

I just wanted to extend a warm welcome to the readers visiting from Inspire Me Baby where I guest blogged about my photobooth setup.

My name is Jamie, and I’m a Madison, WI wedding photographer who loves to share what I know to help you grow your business. Spend some time poking around the site to find all the goodies – trust me, it’s worth it. If you’re interested, you can get to know me a little bit here.

If you’re really observant, you can also find me juggling somewhere on this site as well. Yes, I juggle. Kind of. It’s amusing.

Here’s a few of the “golden nuggets” I think you may find useful (besides the juggling act):

    The Secret to Significantly Increasing Your Portrait Sales

    How to Juggle a Photography Business, a Full-Time Job, and a Family Without Dropping the Ball

    Show Up in Search Engines: 3 Easy WordPress SEO Tips for Photographers

    Top 8 Essential Things to Buy When Starting a Photography Business

    How I Doubled my Website Traffic in One Month Using Facebook

    Free Photographer’s Pricing Guide Series – This pricing guide is different from any other I’ve seen because it allows you to determine your prices for businesses that offer several different types of shoots and services. For example, if you shoot both weddings and portraits and do a bit of graphic design on the side, it will tell you how to take all of that into account when setting your prices. It’s pretty spiffy if I do say so myself, and it makes that math degree I worked so hard for worth it.

If you find this site useful, sign up for our email newsletter. We send it out whenever we post here or have a quick business tip to share and include the behind-the-scenes exclusive news that I feel like sharing about our community. It’s awesome – sign up now:

P.S. If you want bonus points, leave a comment below introducing yourself and sharing your hidden super-hero talent. We’ve all got at least one – so spill it. Super-duper “you’re awesome forever” points to the people who create their own juggling video (or attempt at juggling) and post a link to it below. I’ll even send you a free copy of the pricing guide workbook if you post your juggling video before midnight EST on Wednesday May 18th.

Categorized Under: Business Help Tags: Inspire Me Baby/ Photographer's Pricing Guide/ Photography Tools

The Secret to Significantly Increasing Your Portrait Sales

Madison Family Portrait Photographer

I used to be a shoot-and-burn portrait photographer, but wow was that a mistake. I don’t even want to think about how much money I lost by doing things that way.

It made logical sense to me. I am mainly a wedding photographer, and I didn’t promote my portraits much at all because I simply didn’t have time for them or for placing print orders. People got their disk of images, an occasional 8×10, and it was quick and easy.

If someone had told me that I’d effectively triple my average portrait sale by taking the extra time to do in-person ordering sessions, I could have shot fewer portraits and still made more money in the same amount of time.

I’m not going to claim to be super-experienced in this because I’m not. I just changed to this method of sales this year. But the results so far have been ridiculously amazing. I had heard from other people that this was the case, but it was hard to fathom that I could have sales as high as they were saying. But the results are amazing.

Here’s what I did to drastically increase my average portrait sale.  [Click to read more]

Categorized Under: Photography Sales Tags: Creative Pricing and Packaging/ In Person Photography Sales/ In Person Portrait Sales/ In Person Sales/ Photographer's Pricing Guide/ Photography Tools/ ProDPI

Photographer’s Pricing Guide: Pricing and Your Market

Your own private island
Photo Credit

This post is the final installment of The Modern Tog’s Photographer’s Pricing Guide series. Here’s the link to Part 1 of the Pricing Guide in case you missed it.
If this is the first time working through a pricing guide, you may be shocked at how much you need to charge to make your desired profit. If you are just starting out and still building a portfolio, you may not feel like you have the experience or quality to be charging that amount yet, or maybe you simply do not believe that anyone in your market would be willing to pay those prices.

Let’s tackle these issues one at a time.  [Click to read more]

Categorized Under: Photography Pricing Tags: Free Photography Pricing Guide/ How to Price Photography/ Photographer's Pricing Guide/ Photographer's Pricing Guide Workbook/ Photography Marketing/ Photography Tools

Photographer’s Pricing Guide: Creating Packages

boxThis post is Part 6 of The Modern Tog’s Photographer’s Pricing Guide series. Here’s the link to Part 1 of the Pricing Guide in case you missed it.
It’s finally time to pull together all the pieces you’ve been working on so far and decide what kind of packages you are going to offer. Before you do this, I highly suggest taking some time to think about your business model. Will you have multiple packages for each type of shoot or do everything a la carte? Or maybe you’ll have one package with several add-on options. Determining how to structure your photography pricing is probably the most difficult part of this step.

If you decide that having packages is best for you, click here to learn how to create photography packages that sell.

Creating Packages

Let’s say that the average amount needed for a portrait shoot is $750. There are several ways that we can get to this number. You can simply charge a session fee and hand over the digital files or you can create a package that includes enough products you offer to get you to the price you need. When you do this, you need to be adding up the Retail Less Costs of Goods. If you use the selected retail amount, you’ll fail to account for the cost of goods and will make less than you should to reach your needed average.

For this example I’m going to create a package completely out of products I offer and not charge an additional session fee. I’ll use the following products as an example.

    Fine Art Album (Retail Less Cost of Goods: $550, Selected Retail Price: $750)
    Print Collection (Retail Less Cost of Goods: $200, Selected Retail Price: $250)

So if we want a package to be $750 after cost of goods, we can select both the Fine Art Album ($550 Retail Less Cost of Goods) and the Print Collection ($200 Retail Less Cost of Goods) to get us to exactly $750. We’d then have to add up the Selected Retail Price of the items to know what to charge our customers for this package. In this case, we’d have to add $750 and $250 to get $1000, which is what we’d charge our customers to ensure that we’re making $750 after we pay for the album and prints.

Making it easy with the Photographer’s Pricing Guide Workbook

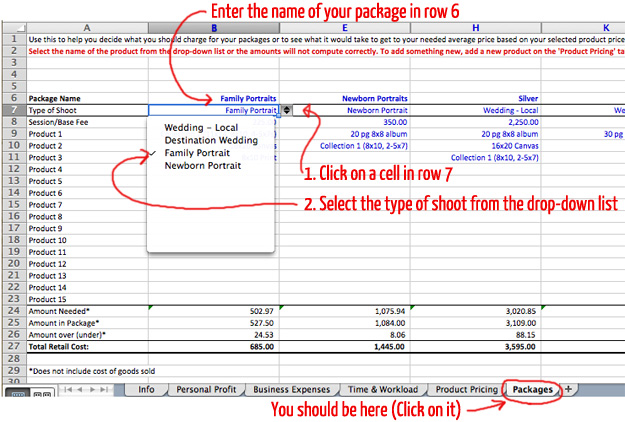
If you’re using the Photographer’s Pricing Guide Workbook, go to the Packages tab at the bottom of the screen. Then enter the name of your package in row 6. Click the cell right below that in row 7 and select the type of shoot from the drop-down menu.

Photographer's Pricing Guide Workbook Screenshot

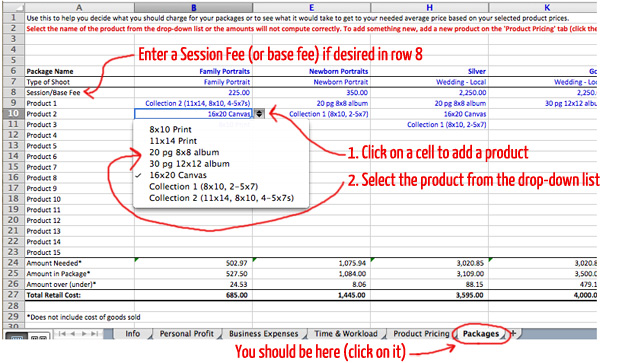
Next, enter a session fee in row 8 if you wish to use one. If not, leave this blank. To add a product to your package, click on a cell and select the desired product from the drop-down list. To add another product to the list, go back to the “Product Pricing” tab (click on it at the bottom of the worksheet) and add it there.

Photographer's Pricing Guide Workbook Screenshot

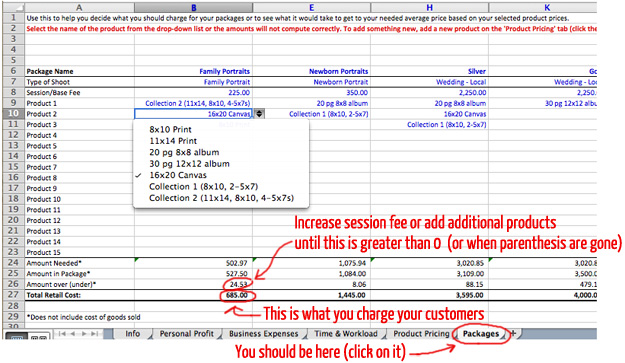
You’ll automatically see the amount needed in row 24, as well as the amount in the package based on what you’ve added so far (row 25). What you’ll want to do is watch the number in row 26, which tells you if you’re under or over the amount you need (a parenthesis around the number means you’re under where you need to be at). My smallest packages are usually slightly below the amount needed, whereas the rest of my packages are about equal or greater than where I need them to be. Your business model should help dictate exactly where you want the packages to be priced in comparison to your average amount needed.

Finally, once your package includes what you want it to include, you’ll see your retail price (what you need to charge your customers) in row 27.

Photographer's Pricing Guide Workbook Screenshot

In our next post, we’ll wrap up this series with a discussion about how to take the numbers you’ve just computed and make them work in your market.

Want to see my Wedding & Portrait Packages?

Jamie M Swanson of The Modern TogWant to see how I structure my Wedding & Portrait packages? You can see this free as part of the exclusive content I share via email. Simply enter your email below and click the button and I’ll send it right to you.


Categorized Under: Photography Pricing Tags: Free Photography Pricing Guide/ How to Price Photography/ How to Price Photography Packages/ Photographer's Pricing Guide/ Photographer's Pricing Guide Workbook/ Photography Packages/ Photography Tools

Photographer’s Pricing Guide: Product Pricing

wedding albumThis post is Part 5 of The Modern Tog’s Photographer’s Pricing Guide series. Here’s the link to Part 1 of the Pricing Guide in case you missed it.
There are many different ways to do pricing for your products that vary based upon what kind of business model you are using. For this pricing guide, we’re going to use the amount of time it takes you to place an order to help determine how much you should be charging in order to make it worth your time.

The benefit of doing it this way is that you are not wasting a bunch of time placing small orders and only making a little bit of money when you could have otherwise have been using that time to shoot more sessions at a higher profit. This makes sure you’ve priced your products so that even small orders are profitable.  [Click to read more]

Categorized Under: Photography Pricing Tags: Free Photography Pricing Guide/ How to Price Photography/ How to Price Photography Products/ Photographer's Pricing Guide/ Photographer's Pricing Guide Workbook/ Photography Product Pricing/ Photography Tools

Photographer’s Pricing Guide: Business Plans and Calculations

abacus
Photo Credit

This post is Part 4 of The Modern Tog’s Photographer’s Pricing Guide series. Here’s the link to Part 1 of the Pricing Guide in case you missed it.

So now that you’ve determined how much profit you want to make and how much your expenses will be, it’s time to combine this with how many shoots you plan to do and see how much you need to be charging. If you’ve never done a pricing guide before, this is often the most shocking part for people. It’s also the most math-intensive, but no worries. If you really aren’t comfortable doing the math, you can always pick up the Pricing Guide Workbook and let it do the hard work for you.  [Click to read more]

Categorized Under: Photography Pricing Tags: Free Photography Pricing Guide/ How to Price Photography/ Photographer's Pricing Guide/ Photographer's Pricing Guide Workbook/ Photography Business Expenses/ Photography Tools

Photographer’s Pricing Guide: Business Expenses

Camera Lenses
Photo Credit

This post is Part 3 of The Modern Tog’s Photographer’s Pricing Guide series. Here’s the link to Part 1 of the Pricing Guide in case you missed it.

Running a business is expensive. Our next step is to consider all the tax-deductible business expenses that you expect to have in a year to make sure that we account for them in our pricing.

There are two main types of expenses, fixed and variable. [Click to read more]

Categorized Under: Photography Pricing Tags: Free Photography Pricing Guide/ How to Price Photography/ Photographer's Pricing Guide/ Photographer's Pricing Guide Workbook/ Photography Business Expense Projections/ Photography Tools

Photographer’s Pricing Guide: Pricing for Profit

Internation Mix of Money
Photo Credit

This post is Part 2 of The Modern Tog’s Photographer’s Pricing Guide series. Here’s the link to Part 1 of the Pricing Guide in case you missed it.
Today it’s time to think about one of the main goals of your business: your profit.

The first step in determining your prices is to figure out how much you want to take home in the form of a paycheck. This amount is what is left over after all your expenses and taxes have been taken out.

There’s two ways to go about this process. I highly suggest doing both methods and comparing the results. [Click to read more]

Categorized Under: Photography Pricing Tags: Free Photography Pricing Guide/ How to Price Photography/ Photographer's Pricing Guide/ Photographer's Pricing Guide Workbook/ Photography Tools

« Previous Page


Enter your email below to have it sent to your inbox for free!

Free Photography Pricing Guide

Privacy Policy · Disclosure · Contact Us

Copyright ©2011 - 2025 · The Modern Tog - All Rights Are Reserved

Copyright © 2025 · Dynamik-Gen on Genesis Framework · WordPress · Log in